Amazon Advertising: How to Use Sponsored Brand Ads

Amazon advertising can be incredibly successful when done correctly. Learn how to use one tool – sponsored brand ads, from a leading Amazon advertising agency:
Sponsored Brand Ads (formerly Headline Search Ads, or HSAs) are ads that appear across Amazon, including search results. They promote both your brand and individual products that you choose to promote on a cost-per-click basis. The ad consists of your brand’s logo, three product images, and a headline relevant to your products. When a shopper clicks on a Sponsored Brand Ad, they will be taken to your store page or the specific product page for the product in your ad.
Where Do Amazon Sponsored Brand Ads Show Up?
Sponsored Brand Ads originally appeared at the top of search results, but recently Amazon has opened up new placements for them to show within search results, below search results, or to the left of search results. Sponsored Brand Ads will appear on desktop, mobile desktop, and mobile app search pages, and do not require the creation of multiple ads for each device on your part – Amazon handles that automatically.
What Do They Look Like?
Sponsored Brand Ads dynamically change their appearance depending on the device and placement, but they generally consist of your brand logo on the left, a headline to promote your brand and products, and three product listings that include product ratings. A shopper can click on the brand logo or the headline and be sent to your store page, or they can click on one of the products and be sent to that product’s page.
Now that you know the basics, learn how to structure your brand ad campaigns for success.
Build Around Product Types
Since Sponsored Brand Ads promote both your brand and three individual products, you will want to be more general in how you structure your campaigns. With Sponsored products, we recommend building around individual ASINs; with brand ads, we don’t have to build out dozens of campaigns with as we do not want to build around specific products or terms that are not relevant to other products in your store. Based on the number of product types in the store, we recommend using three types of campaigns: Brand, Product Type, and Competitor.
- Brand will consist of all Brand terms and variations with product names, with one product listing from each product type included in the ad.
- Product Type will consist of both product names and generic, but relevant, keywords to that product type.
- Competitor will consist of relevant competitor brand names and products, again with one product listing from each product type included in the ad.
How to Create a Sponsored Brand Ad Campaign
Ready to get started? Here’s how to build successful brand ad campaigns:
Create Campaign – Start Building Your Ad
Once you click Create Campaign in the Campaign Manager, you will be asked to select either a Sponsored Product or Sponsored Brand Ad Campaign.
Click on Sponsored Brands, and you will be brought to a page asking for the Campaign Name, the Start and End Date, Budget, Brand, and what your landing page will be. Begin by giving your Campaign a name that is easily recognizable. Make sure to name it something that clearly designates the campaign’s type and goal.
Next, you will select the campaign duration or schedule when to start and stop the campaign. You can extend the end date of the campaign while the campaign is running, but once it stops, you cannot restart it. Selecting an end date also allows you to choose between Daily and Lifetime for your budget. We recommend starting with a $20/day budget to determine how much you can expect to spend per day, and if you are running out of budget before the day ends.
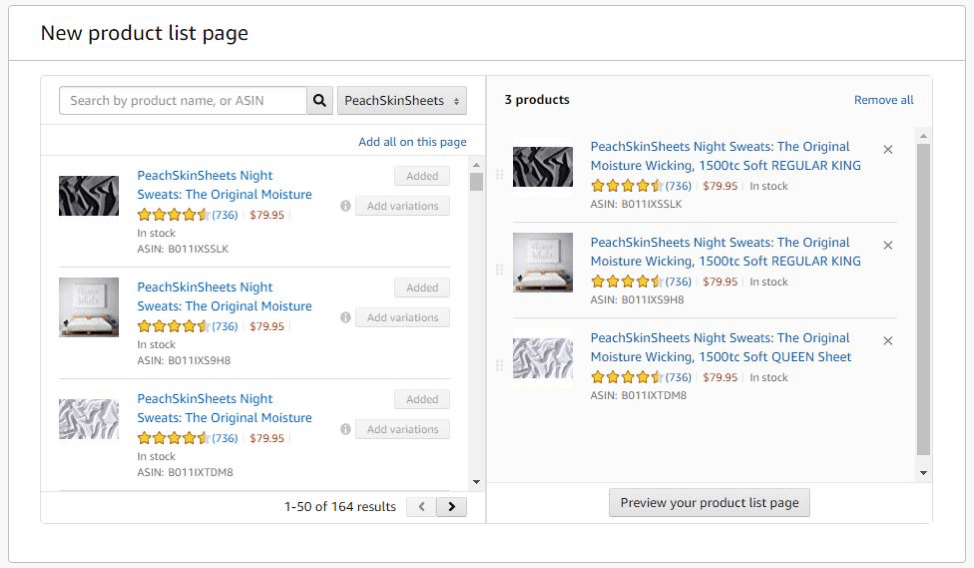
Lastly, you pick your landing page: either the Amazon Store for your Brand, or a Product List Page consisting of three or more products you want to feature. If you do not have an Amazon Store, choose New Product List Page and select which products you want to promote.
But what products do you choose?
New Product List Page
First and foremost, remember that these products will share keywords, so make sure they are related to each other and the keywords for the campaign. For Product Group campaigns, this will mean simply picking products from the same group, but for Brand and Competitor campaigns, you will want to select a more diverse selection that displays the range of products you sell.
Quick tip: Your products’ ratings will show under the product in some ad placements, so you want to use 4+ star items.
There is the visual component of the ad to consider, as well, so pick products that are visually appealing but also distinct from the other products; you don’t want to show 3 images that look exactly the same.
Last but not least, consider using your best-selling products. Amazon will suggest some products available for Sponsored Brand Ads from you store, but you can also search for specific products by product name or ASIN. Combine all of those measures together to come up with at least three products you want to promote.
The Creative Page
Here is where you will build the ad that shoppers will see.
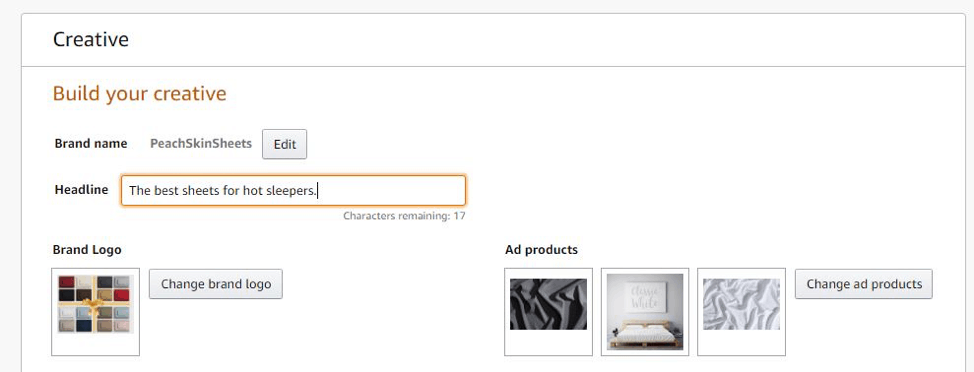
First, write a headline that describes your brand and why the shopper should choose to purchase your products. You are limited to 50 characters and can only capitalize the first letter of the first word and proper nouns, just like a normal sentence. (No capitalizing the first letter in every word like a Google Search ad). You will also want to make sure the headline is relevant to the keywords for this campaign: push your brand for the Brand and Competitor campaigns, and the products for the Product Type campaigns.
After writing your headline, you will select your brand logo. Amazon requires that the image be at least 400×400 pixels and should be easy to read, have good contrast, and use simple or solid-color backgrounds.
Next, you are given the chance to choose your ad products again. This is helpful when looking at the ad previews below and seeing that certain products don’t look as good as expected. You can also adjust your image order in the ad preview. Take a minute to view all of the placements, including those in the other placements tab, to see how your ads will look across the platform.
The Keywords Page
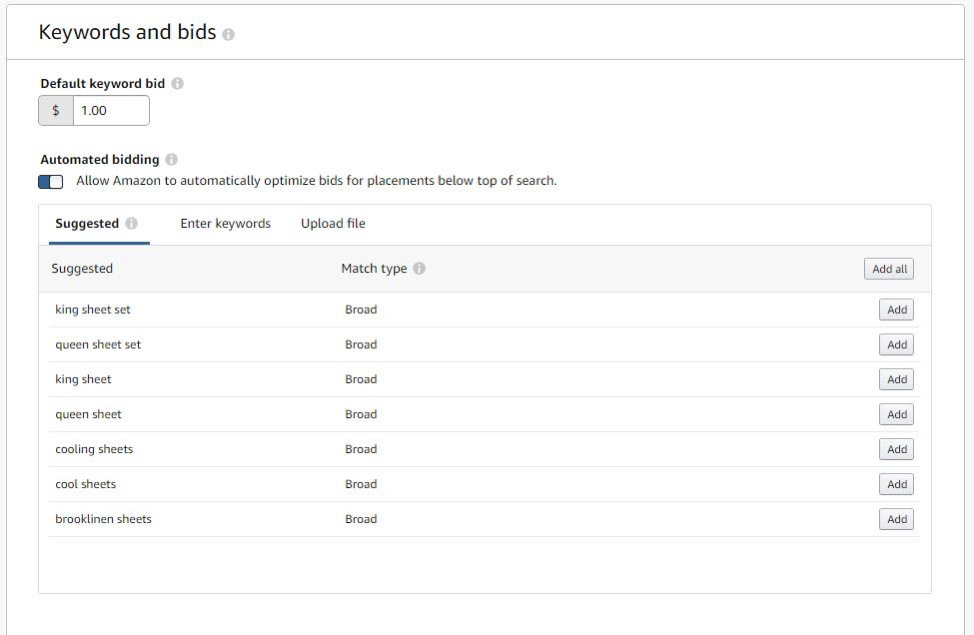
With your ad creative all set, it is time to determine when your Sponsored Brand Ad will show. That is done by selecting keywords, match types, and bids. Sponsored Brand Ads are a cost-per-click ad, so you will begin by choosing a default keyword bid. This will be the highest price you are willing to pay for a click on your ad.
Quick Tip: A higher bid leads to your ad showing with more frequency.
One thing to consider when determining a bid is that compared to Sponsored Products, Sponsored Brand Ads have fewer placements available. As such, bids tend be more expensive to reach the top placement for Sponsored Brand Ads.
Quick Tip: To help, Amazon has added Automated Bidding that will optimize your bids by lowering them to reach other HSA placements while also improving conversion rates. It is important to note, however, that the Automated Bidding will not raise your bid above the maximum bid you set.
We recommend using Automated Bidding to help effectively increase sales. However, if your goal is more focused on brand awareness, then avoiding Automated Bidding will give you a better chance to win the top placement at a higher CPC. Also, while this is the default bid for your keywords, you can change individual keyword bids later.
After setting your default bid, you now select your keywords. Once again, your keywords should be relevant to your campaign: Brand, Product Type, or Competitor. Based on the products you selected, Amazon will suggest a few keywords that they find are relevant to the products.
You can also use any relevant keywords from Sponsored Products or even Google Ads. However, it is important to consider what your goal is for the campaign and therefore what keywords you upload (as well as their match type). On a scale of brand awareness to effective sales, you should get more specific with your keywords and match types. If you want to get your name out there, more general keywords with a broad or phrase match type will help you most. However, more specific keywords with phrase and exact match type will increase your chances for finding shoppers more likely to buy, and for a more effective price.
Also, unlike Sponsored Products, Sponsored Brand Ads do not have negative keyword lists. This means that your ad has the potential to show for less-relevant search terms if you don’t specify with your keywords what searches you want to show up for.
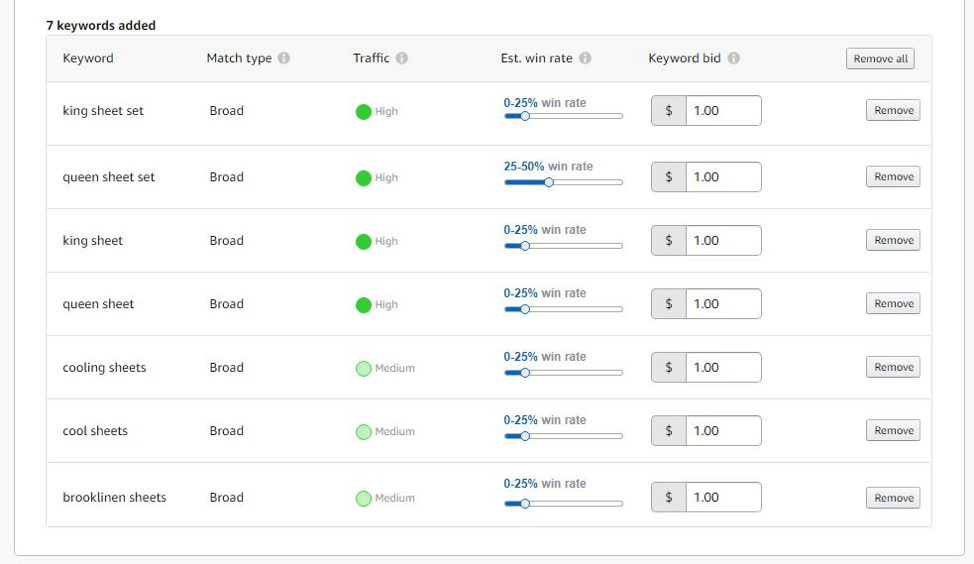
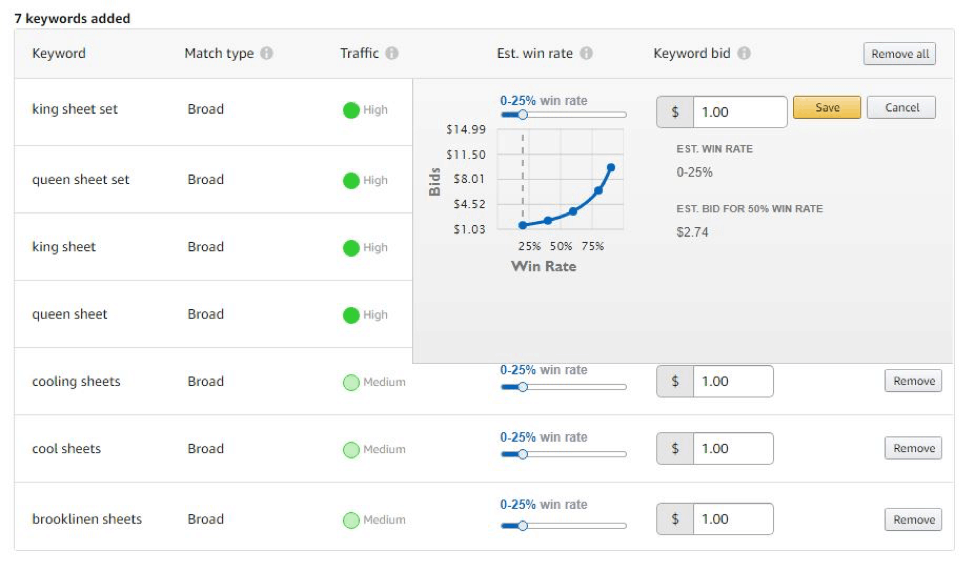
Once you have uploaded your keywords and their match types, Amazon will show expected traffic and win rates for those terms. Traffic is based directly on the keyword’s past searches in the products’ category. Win rate is an even more helpful metric: it show’s what percentage of impressions you can expect to win based on the keyword, the match type, your bid, and other advertisers’ bids. It also includes a helpful slider that allows you to see how much you need to bid to win a certain percentage range of impressions.
Quick Tip: What percentage range should you aim for? We have found that high bids to reach 75-90% or higher, combined with Automated Bidding, allows for the opportunity to reach high impressions while staying efficient with Average Cost Per Clicks much lower than the bid. This works by keeping bids low when sales are cost prohibitive, but still getting impressions at different placements.
Once you have reviewed the campaign one more time, click on “Submit for Review” at the bottom of the page and the campaign will be submitted to Amazon to go through a review process. The process can take up to 72 hours to review, so keep an eye on the account for the next three days to see when it goes live.
Have questions about running Sponsored Brand Ads? Drop us a line in the comments!
Recent Posts
In the competitive world of real estate, pay per lead models have emerged as a…
You’ve heard it here, you’ve heard it there, you’ve heard it from any SEO agency:…


